Using Slic3r and the XYZ Printing Da Vinci 1.0
3D printing is opening up a world of possibilities across the globe. With a 3D printer and a little CAD knowledge you can build just about anything from computer parts like fan shrouds and heat diffusers to artistic elements and even space craft parts. Previously they were only available to die hard hobbyists willing to put together an open source kit and those with deep industrial pockets but today a 3d printer can be had for a few hundred dollars. Recently, I purchased a 3D printer, the XYZ Printing Da Vinci 1.0 to experiment with. We have a few key uses internally at AppliedI that I think fabricating our own components will be extremely interesting and useful but before I start making bolt-ons for the cloud, I need to get up to speed on this device.
The XYZ Printing Da Vinci is frequently scrutinized in the 3D printing world and the XYZware (the software running the XYZ Printing) is most frequently bashed as being lower quality and limited. One of the most common recommendations is to ‘jailbreak’ your printer by loading a custom firmware on it and then using open source software to control it. Not ready to void my warranty I was looking for alternatives and found that may users recommend using the slic3r slicer. A slicer takes a 3d model and converts it into a series of ‘slices’ that are then printed one at a time vertically to create your 3d object. Needless to say the better slicer, the better the print. But there’s not a lot of guidance out there around using slic3r and the Da Vinci. Most of the users it seems are hard core hackers, makers and hobbyists so someone new to 3D printing (like me) is left wondering how can I make my prints better. Well, here’s my first post regarding my journey to discover the world of 3D printing.
In this post I’ll walk you through what I did to get slic3r working correctly with my printer. In a nutshell, I found some settings on the internet, entered them into slic3r, downloaded a model, sliced it, saved it to a format the Da Vinci understood and then printed it. Then I sliced the same image using the Da Vinci’s slicer and printed it for comparison.
For this comparison I’m using slic3r 1.1.7 and xyzware 1.1.33.3 the only modifications to my xyzware is blocking outbound internet access from the application to avoid involuntary firmware upgrades (if it ain’t broke, don’t fix it).
Configuring Slic3r for DaVinci
There’s not a single ‘here how you do it’ repository on the Internet on the DaVinci so I had to find a few different articles and forum posts and piece them together, do I know what all of these settings do? No, but I have a pretty good hunch. The three sources I found most helpful were:
- https://www.scribd.com/doc/224483423/Using-Slic3r-With-the-XYZprinting-DaVinci-1-0
- http://www.soliforum.com/topic/6279/xyzprinting-da-vinci-10-hacking
- http://voltivo.com/forum/davinci-firmware/148-your-configuration (this was the most useful)
Here’s my Slic3r Configuration


The G-CODE Header was:
M140 S[first_layer_bed_temperature] ; Bed (no wait)
M106 S255 ; Start fan
G90 ; set absolute coordinates
G28 ; home all axis
M190 S[first_layer_bed_temperature] ; Bed (wait)
M104 S[first_layer_temperature] ; Extruder (no wait)
M109 S[first_layer_temperature] ; Extruder (wait)
M117 Start
M300 s1000 p400 ; Beep
M300 s1500 p400
M300 s2000 p400
M300 s2500 p400
M117 Cleaning
M100 ; Cleaning
G1 Z5 F1500
G1 X0 Y15 F1000
G1 X32 Y30 F1000
G92 E0 ; reset extrusion distance
G1 Z[first_layer_height] F4800.000
G1 X32 Y170 E14 F1000
G1 X32 Y185 F1000
M117 Printing
The G-CODE Footer was:
M117 Done
G92 E0 ; reset extrusion distance
M104 S0 ; turn off extruder
M140 S0 ; turn off Bed
G90 ; Absolute
G28 X0 Y0 ; home
M117 Down Bed
G1 Z200 ; Lower bed
M117 Cleaning
M100 ;Cleaning
M84 ; Disable motors
M117 Cooling
M190 S55 ; Bed (cooling)
M116 ; Wait for all temperatures
M140 S0 ; turn off Bed
M117 Pickup piece
M300 s2500 p400 ; Beep
M300 s2000 p400
M300 s1500 p400
M300 s1000 p400
M84 ; Disable motors
M117 Printer Ready
The Slic3r Post Processing
The model I decided to use was: http://www.thingiverse.com/thing:18479/ it’s got nice detail, is fairly small and everyone digs a little frog..
With those settings I then imported an image, sliced it and saved the g-code. Now for the XYZ Da Vinci, you need to open the file with notepad++ and edit the header. Based on what I’ve read in the above links the header is ignored but I don’t think that’s the case. I think the header is actually displayed when you click info. Anyway, the header you need to edit is here. The original header is similar to:
; generated by Slic3r 1.1.7 on 2014-12-01 at 18:56:10
; perimeters extrusion width = 0.40mm
; infill extrusion width = 0.42mm
; solid infill extrusion width = 0.42mm
; top infill extrusion width = 0.42mm
; support material extrusion width = 0.40mmG21 ; set units to millimeters
and I changed it to:
; filename = composition.3w
; machine = daVinciF10
; material = default
; layer_height = 0.2
; fill_density = 0.10
; shells = 3
; speed = 60
; total_layers = 124
; total_filament = 2116.02
; dimension = 51.23:45.21:24.95
; extruder = 1
G21 ;
Then I clicked control-A (select all) and in notepad clicked “Plugins-> Mime Tools –> Base64 Encode”

and then save the file with a .3w extension.
Now in XYZware when you click print the first time, it slices the image and gives you the option to save and cancel or print. If you click print it transmits the .3w file to the printer and prints, if you click cancel and print it allows you to save the .3w file. Then later you can open XYZware and click import and open a .3w file. This way the file is brought in already sliced and ready to go!
Now I mentioned the headers seemed to be used in the info page. Here’s what I mean. If you look at my actual gcode you’ll see it’s configured for a .3 layer thickness but the info dialog says it’s .2 (just like in the comments/header) see:

BTW, Slic3r creates that little ring around the print before it prints, that’s pretty cool. Here’s the same model sliced in XYZware

But if you scroll to the bottom of the gcode file you’ll see the slic3r settings as comments and you’ll see the layer settings: layer_height = 0.3 :
; filament used = 3195.7mm (7.7cm3)
; avoid_crossing_perimeters = 0
; bed_size = 200,200
; bed_temperature = 90
; bridge_acceleration = 0
; bridge_fan_speed = 100
; bridge_flow_ratio = 1
; brim_width = 0
; complete_objects = 0
; cooling = 1
; default_acceleration = 0
; disable_fan_first_layers = 1
; duplicate_distance = 6
; end_gcode = M117 DonenG92 E0 ; reset extrusion distancenM104 S0 ; turn off extrudernM140 S0 ; turn off BednG90 ; AbsolutenG28 X0 Y0 ; homenM117 Down BednG1 Z200 ; Lower bednM117 CleaningnM100 ;CleaningnM84 ; Disable motorsnM117 CoolingnM190 S55 ; Bed (cooling)nM116 ; Wait for all temperaturesnM140 S0 ; turn off BednM117 Pickup piecenM300 s2500 p400 ; BeepnM300 s2000 p400nM300 s1500 p400nM300 s1000 p400nM84 ; Disable motorsnM117 Printer Readynn
; external_perimeters_first = 0
; extruder_clearance_height = 20
; extruder_clearance_radius = 20
; extruder_offset = 0x0
; extrusion_axis = E
; extrusion_multiplier = 1
; fan_always_on = 0
; fan_below_layer_time = 60
; filament_diameter = 1.75
; first_layer_acceleration = 0
; first_layer_bed_temperature = 90
; first_layer_extrusion_width = 200%
; first_layer_speed = 30%
; first_layer_temperature = 230
; g0 = 0
; gcode_arcs = 0
; gcode_comments = 0
; gcode_flavor = reprap
; infill_acceleration = 0
; infill_first = 0
; layer_gcode =
; max_fan_speed = 100
; min_fan_speed = 100
; min_print_speed = 10
; min_skirt_length = 0
; notes =
; nozzle_diameter = 0.4
; only_retract_when_crossing_perimeters = 1
; ooze_prevention = 0
; output_filename_format = [input_filename_base].gcode
; perimeter_acceleration = 0
; post_process =
; print_center = 100,100
; resolution = 0
; retract_before_travel = 2
; retract_layer_change = 1
; retract_length = 1
; retract_length_toolchange = 10
; retract_lift = 0
; retract_restart_extra = 0
; retract_restart_extra_toolchange = 0
; retract_speed = 40
; skirt_distance = 6
; skirt_height = 1
; skirts = 1
; slowdown_below_layer_time = 30
; spiral_vase = 0
; standby_temperature_delta = -5
; start_gcode = M140 S[first_layer_bed_temperature] ; Bed (no wait)nM106 S255 ; Start fannG90 ; set absolute coordinatesnG28 ; home all axisnM190 S[first_layer_bed_temperature] ; Bed (wait)nM104 S[first_layer_temperature] ; Extruder (no wait)nM109 S[first_layer_temperature] ; Extruder (wait)nM117 StartnM300 s1000 p400 ; BeepnM300 s1500 p400nM300 s2000 p400nM300 s2500 p400nM117 CleaningnM100 ; CleaningnG1 Z5 F1500nG1 X0 Y15 F1000nG1 X32 Y30 F1000nG92 E0 ; reset extrusion distancenG1 Z[first_layer_height] F4800.000nG1 X32 Y170 E14 F1000nG1 X32 Y185 F1000nM117 Printingn
; temperature = 230
; threads = 2
; toolchange_gcode =
; travel_speed = 150
; use_firmware_retraction = 0
; use_relative_e_distances = 0
; vibration_limit = 0
; wipe = 0
; z_offset = 0
; dont_support_bridges = 1
; extrusion_width = 0
; first_layer_height = 0.35
; infill_only_where_needed = 0
; interface_shells = 0
; layer_height = 0.3
; raft_layers = 0
; seam_position = aligned
; support_material = 1
; support_material_angle = 0
; support_material_enforce_layers = 0
; support_material_extruder = 1
; support_material_extrusion_width = 0
; support_material_interface_extruder = 1
; support_material_interface_layers = 3
; support_material_interface_spacing = 0
; support_material_interface_speed = 100%
; support_material_pattern = pillars
; support_material_spacing = 2.5
; support_material_speed = 50
; support_material_threshold = 0
; bottom_solid_layers = 4
; bridge_speed = 50
; external_perimeter_speed = 50%
; extra_perimeters = 1
; fill_angle = 45
; fill_density = 40%
; fill_pattern = honeycomb
; gap_fill_speed = 20
; infill_every_layers = 1
; infill_extruder = 1
; infill_extrusion_width = 0
; infill_speed = 70
; overhangs = 1
; perimeter_extruder = 1
; perimeter_extrusion_width = 0
; perimeter_speed = 50
; perimeters = 3
; small_perimeter_speed = 30
; solid_fill_pattern = rectilinear
; solid_infill_below_area = 70
; solid_infill_every_layers = 0
; solid_infill_extrusion_width = 0
; solid_infill_speed = 50
; thin_walls = 1
; top_infill_extrusion_width = 0
; top_solid_infill_speed = 40
; top_solid_layers = 4
Now a couple notes. I used the print speed found in the 3rd link above which was faster than the scribd speeds. The printing was noticeably faster too. The quality I think suffered but I think that was a product of the print speed and using a .3 instead of a .2. I’ll try the scribd settings in a follow up print of the same model.
What’s the final product look like?
Here’s the slic3r output


I included an output of how long the print went for.
Using the built in XYZware here’s the print out with it’s settings:


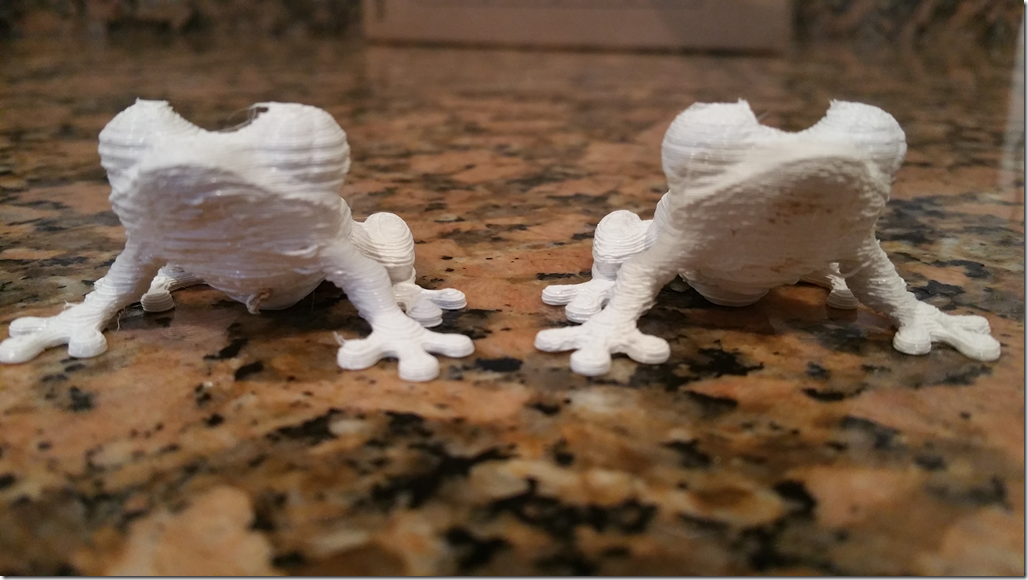
Side by Side Comparison

Left: Slic3r Right: XYZ

Left XYZ Right Slic3r

Left: XYZ Right: Slic3r

Left:XYZ Right: Slic3r

Left: XYZ Right: Slic3r

Left: XYZ Right Slic3r
Both frogs printed at .3 and the slic3r generated image printed 8 minutes faster. I think for the 8 minutes the slic3r image would have generated a little nicer if I slowed it down but personally, I’m hard pressed to say which is nicer because they both have defects and imperfections. I’m wondering if adjusting the speed and then moving to .2 or .1 layers to see if we see better performance from one or the other. The one thing I can see is that using slic3r you have a lot more control over the slicing and functionality so I can see why the power users opt for it over the default slicer.
Finally, Here’s my slicer config bundle from this print:
# generated by Slic3r 1.1.7 on Sat Nov 29 19:31:29 2014
[filament:Simple Mode]
bed_temperature = 100
extrusion_multiplier = 1
filament_diameter = 1.75
first_layer_bed_temperature = 100
first_layer_temperature = 230
temperature = 230
[presets]
filament = Simple Mode.ini
print = Simple Mode.ini
printer = Simple Mode.ini
[print:Simple Mode]
bottom_solid_layers = 3
brim_width = 0
complete_objects = 0
extruder_clearance_height = 20
extruder_clearance_radius = 20
fill_density = 40%
fill_pattern = honeycomb
infill_speed = 60
layer_height = 0.3
perimeter_speed = 30
perimeters = 3
raft_layers = 0
support_material = 0
support_material_spacing = 2.5
top_solid_layers = 3
travel_speed = 130
[printer:Simple Mode]
bed_size = 200,200
end_gcode = M104 S0 ; turn off temperaturenG28 X0 ; home X axisnM84 ; disable motorsn
gcode_flavor = reprap
nozzle_diameter = 0.4
print_center = 100,100
retract_length = 1
retract_lift = 0
start_gcode = G28 ; home all axesnG1 Z5 F5000 ; lift nozzlen
z_offset = 0
[settings]
autocenter = 1
mode = simple
[simple]
avoid_crossing_perimeters = 1
bed_size = 200,200
bed_temperature = 100
bottom_solid_layers = 3
bridge_acceleration = 0
bridge_fan_speed = 100
bridge_flow_ratio = 1
bridge_speed = 60
brim_width = 0
complete_objects = 0
cooling = 1
default_acceleration = 0
disable_fan_first_layers = 1
dont_support_bridges = 1
duplicate_distance = 6
end_gcode = M104 S0 ; turn off temperaturenG28 X0 ; home X axisnM84 ; disable motorsn
external_perimeter_speed = 70%
external_perimeters_first = 0
extra_perimeters = 1
extruder_clearance_height = 20
extruder_clearance_radius = 20
extruder_offset = 0x0
extrusion_axis = E
extrusion_multiplier = 1
extrusion_width = 0
fan_always_on = 0
fan_below_layer_time = 60
filament_diameter = 1.75
fill_angle = 45
fill_density = 40%
fill_pattern = honeycomb
first_layer_acceleration = 0
first_layer_bed_temperature = 100
first_layer_extrusion_width = 200%
first_layer_height = 0.4
first_layer_speed = 30%
first_layer_temperature = 230
g0 = 0
gap_fill_speed = 20
gcode_arcs = 0
gcode_comments = 0
gcode_flavor = reprap
infill_acceleration = 0
infill_every_layers = 10
infill_extruder = 1
infill_extrusion_width = 0
infill_first = 0
infill_only_where_needed = 0
infill_speed = 60
interface_shells = 0
layer_gcode =
layer_height = 0.3
max_fan_speed = 100
min_fan_speed = 35
min_print_speed = 10
min_skirt_length = 0
notes =
nozzle_diameter = 0.4
only_retract_when_crossing_perimeters = 1
ooze_prevention = 0
output_filename_format = [input_filename_base].gcode
overhangs = 1
perimeter_acceleration = 0
perimeter_extruder = 1
perimeter_extrusion_width = 0
perimeter_speed = 30
perimeters = 3
post_process =
print_center = 100,100
raft_layers = 0
resolution = 0
retract_before_travel = 2
retract_layer_change = 1
retract_length = 1
retract_length_toolchange = 10
retract_lift = 0
retract_restart_extra = 0
retract_restart_extra_toolchange = 0
retract_speed = 30
seam_position = aligned
skirt_distance = 6
skirt_height = 1
skirts = 1
slowdown_below_layer_time = 30
small_perimeter_speed = 30
solid_fill_pattern = rectilinear
solid_infill_below_area = 70
solid_infill_every_layers = 0
solid_infill_extrusion_width = 0
solid_infill_speed = 60
spiral_vase = 0
standby_temperature_delta = -5
start_gcode = G28 ; home all axesnG1 Z5 F5000 ; lift nozzlen
support_material = 0
support_material_angle = 0
support_material_enforce_layers = 0
support_material_extruder = 1
support_material_extrusion_width = 0
support_material_interface_extruder = 1
support_material_interface_layers = 3
support_material_interface_spacing = 0
support_material_interface_speed = 100%
support_material_pattern = pillars
support_material_spacing = 2.5
support_material_speed = 60
support_material_threshold = 0
temperature = 230
thin_walls = 1
threads = 2
toolchange_gcode =
top_infill_extrusion_width = 0
top_solid_infill_speed = 50
top_solid_layers = 3
travel_speed = 130
use_firmware_retraction = 0
use_relative_e_distances = 0
vibration_limit = 0
wipe = 0
z_offset = 0